
NestJS (2)
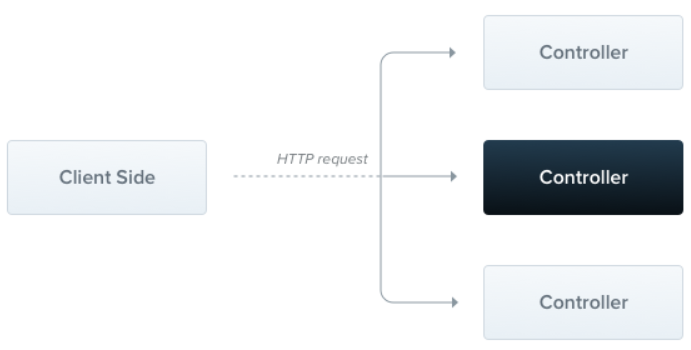
Controller
// Nest Standard
import {
  Controller,
  Get,
  Query,
  Post,
  Body,
  Put,
  Param,
  Delete,
} from "@nestjs/common";

@Controller("cats")
export class CatsController {
  @Post()
  create(@Body() createCatDto: CreateCatDto) {
    return "This action adds a new cat";
  }

  @Get()
  findAll(@Query() query: ListAllEntities) {
    return `This action returns all cats (limit: ${query.limit} items)`;
  }

  @Get(":id")
  findOne(@Param("id") id: string) {
    return `This action returns a #${id} cat`;
  }

  @Put(":id")
  update(@Param("id") id: string, @Body() updateCatDto: UpdateCatDto) {
    return `This action updates a #${id} cat`;
  }

  @Delete(":id")
  remove(@Param("id") id: string) {
    return `This action removes a #${id} cat`;
  }
}
- 위 예시에선 단순 문자열을 리턴하여 응답했지만, 만약 객체를 리턴한다면 자동으로 json으로 serialize해서 응답한다.
@Post는 default로 201로 응답하고 나머지 http메소드 어노테이션은 200으로 응답한다.- 이를 상황 따라 다르게 제어하려면 위와 같은 nest의
standard방식이 아닌library-specific방식으로 구현해야 한다.
standard vs library-specific
- response object를 어떻게 다루느냐로 두 개의 차이가 생긴다.
- standard
- 단순 숫자, 문자형의 primitive type으로 응답하면 그대로 plain text로 응답하고, javascript object로 응답하면 알아서 json으로 serialize하여 응답한다.
@HttpCode(),@Header(),@Redirect()등으로 세부적인 응답을 다룬다.- nest에서 권장하는 방식이다.
- library-specific
- express의
@Resquest,@Response,@Next를 사용하는 방식이다. - 단점 : platform-dependent, harder to test
- express의
- 두 방식을 한 핸들러에서 동시에 사용하게 되면 Standard 옵션은 자동으로 비활성화 된다.
- 이를 해결하기 위해선 @Res({ passthrough: true })와 같이 passthrough 옵션을 true로 설정해줘야 한다.
// Library-specific
import { Controller, Get, Post, Res, HttpStatus } from "@nestjs/common";
import { Response, Request } from "express";

@Controller("cats")
export class CatsController {
  @Post()
  create(@Res() res: Response) {
    res.status(HttpStatus.CREATED).send();
  }

  @Get()
  findAll(@Res({ passthrough: true }) res: Response) {
    res.status(HttpStatus.OK);
    return [];
  }

  @Get(":id")
  findOne(@Req req: Request, @Res({ passthrough: true }) res: Response) {
    console.log(req.params["id"]);
    res.status(HttpStatus.OK);
    return [];
  }
}
dto는 class or interface??
- NestJS에서는 둘 중 classes를 사용해 정의할 것을 추천한다.
- 이유는 classes는 ES6 표준 문법이고 따라서 JavaScript로 컴파일된 후에도 실제 entities를 보존할 수 있게 된다.
- 반면 interfaces는 컴파일 후 삭제되기 때문에 런타임에 참조할 수 없다.
- 이는 매우 중요한데, 왜냐하면 런타임에 이러한 값을 접근해 Pipe와 같이 추가적으로 무언가 가능케 할 수 있기 때문이다.
Mapped Types
- 주로 dto클래스를 하나 만들어놓고 프로퍼티들을 재사용하거나 조합하기 위해서 사용한다.
@nestjs/mapped-types사용하는 것이 일반적이나 만약 swagger를 사용한다면@nestjs/swagger로 사용하는 것이 좋다.(graphql도 마찬가지)@nestjs/mapped-types를 상속받고 swagger에 model들을 추가시켜주기 때문이다.
// import { ApiProperty } from '@nestjs/mapped-types';
import { ApiProperty } from "@nestjs/swagger";

export class CreateCatDto {
  @ApiProperty()
  name: string;

  @ApiProperty()
  age: number;

  @ApiProperty()
  breed: string;
}
Partial Type
// name, age, breed를 원소로 하는 집합의 부분집합 dto
export class UpdateCatDto extends PartialType(CreateCatDto) {}
Pick Type
// 특정 원소만 골라내어 만든 집합 dto
export class UpdateCatAgeDto extends PickType(CreateCatDto, ["age"] as const) {}
Omit Type
// 특정 원소를 뺀 집합 dto
export class UpdateCatDto extends OmitType(CreateCatDto, ["name"] as const) {}
Intersection Type
// 다른 집합과의 합집합 dto
export class AdditionalCatInfo {
  @ApiProperty()
  color: string;
}
export class UpdateCatDto extends IntersectionType(
  CreateCatDto,
  AdditionalCatInfo
) {}
Composition Type
// 위에 있는 것들 조합 (e.g. name원소를 뺀 집합에서의 부분집합)
export class UpdateCatDto extends PartialType(
  OmitType(CreateCatDto, ["name"] as const)
) {}
Provider
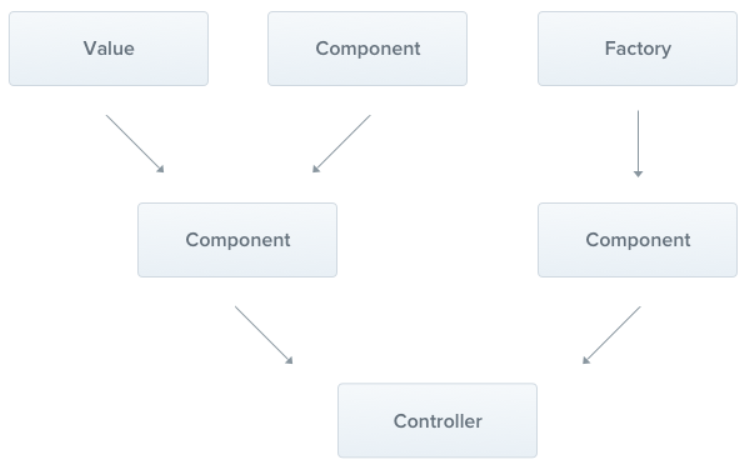
- Nest의 핵심 중의 핵심이다. ⇒ 의존성 주입 by using
@Injectable() - service, repository, factory, helper 등이 provider로써 사용된다.
// cats.service.ts  ->  provider역할
import { Injectable } from "@nestjs/common";

@Injectable()
export class CatsService {
  private readonly cats: Cat[] = [];

  create(cat: Cat) {
    this.cats.push(cat);
  }

  findAll(): Cat[] {
    return this.cats;
  }
}
// cats.controller.ts  ->  provider사용
@Controller("cats")
export class CatsController {
  // provider를 생성자로 의존성 주입하여 사용
  constructor(private readonly catsService: CatsService) {}

  @Post()
  async create(@Body() createCatDto: CreateCatDto) {
    this.catsService.create(createCatDto);
  }

  @Get()
  async findAll(): Promise<Cat[]> {
    return this.catsService.findAll();
  }
}
- The
@Injectable()decorator attaches metadata, which declares that CatsService is a class that can be managed by the Nest IoC container. - In
cats.controller.ts,CatsControllerdeclares a dependency on theCatsServicetoken with constructor injection - In
app.module.ts, we associate the tokenCatsServicewith the classCatsServicefrom the cats.service.ts file. We’ll see below exactly how this association (also called registration) occurs.
// 사실은 provider는 이렇게 주입해야 한다.
providers: [
  {
    provide: CatsService,
    useClass: CatsService,
  },
];
- Here, we are clearly associating the token
CatsServicewith the classCatsService. - When the Nest IoC container instantiates a
CatsController, it first looks for any dependencies*. When it finds theCatsServicedependency, it performs a lookup on theCatsServicetoken, which returns theCatsServiceclass, per the registration step (#3 above). AssumingSINGLETONscope (the default behavior), Nest will then either create an instance ofCatsService, cache it, and return it, or if one is already cached, return the existing instance.
Scope
- Provider는 보통 애플리케이션 생명주기와 동기화된 scope(생명주기)를 가진다. 애플리케이션이 bootstrap 되면 의존성은 평가되고 인스턴스화 된다. 그리고 종료할 때 같이 파괴된다. 그러나 request-scoped 생명주기(요청이 들어올때마다 새로운 객체 생성) 또한 만들 수 있다. —> request-scoped provider
Property-based injection
- 생성자가 아닌 클래스의 프로퍼티로 의존성을 주입받는다. by using
@Inject() 'HTTP_OPTIONS'는 custom provider token이다.
import { Injectable, Inject } from "@nestjs/common";

@Injectable()
export class HttpService<T> {
  @Inject("HTTP_OPTIONS")
  private readonly httpClient: T;
}
Optional Provider
- When the lack of the provider wouldn’t lead to errors, use
@Optional().
import { Injectable, Optional, Inject } from "@nestjs/common";

@Injectable()
export class HttpService<T> {
  constructor(@Optional() @Inject("HTTP_OPTIONS") private httpClient: T) {}
}
Module
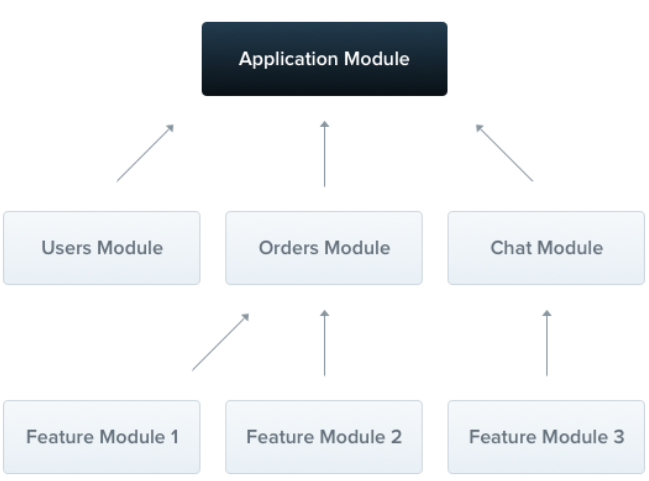
- module은 NestJS가 애플리케이션 구조를 조직할 수 있는 메타데이터를 제공해준다.
- Module은 자연스럽게 Providers를 캡슐화 한다.
@Module()프로퍼티providers: 해당 모듈에서 공유되어 사용되고, Nest injector에 의해 인스턴스화 되는 providerscontrollers: 해당 모듈에서 정의되고 인스턴스화 되는 controllersimports: 해당 모듈에서 필요한 providers를 export한 모듈을 import해온 리스트exports: 해당 모듈에서 제공되는 providers를 다른 모듈에서 import하여 쓸 수 있게 export하는 리스트
@Module({
  // DogsService를 다루는 모듈에서 exports: [DogsService]를 해줘야 해당 모듈에서 DogsService가 사용이 가능하다.
  // 만약 DogsModule가 아닌 DogsService를 넣어준다면 아래와 같은 에러 발생
  /*
			ERROR [ExceptionHandler] Nest can't resolve dependencies of the CatsService (?). Please make sure that the argument DogsService at index [0] is available in the UsersModule context.
			Potential solutions:
			- If DogsService is a provider, is it part of the current CatsModule?
			- If DogsService is exported from a separate @Module, is that module imported within CatsModule?
			@Module({
				imports: [ the Module containing DogsService ]
			})
	*/
  imports: [DogsModule],
  controllers: [CatsController],
  providers: [CatsService],
  // Now any module that imports the CatsModule has access to the CatsService
  // and will share the same instance with all other modules that import it as well.
  exports: [CatsService],
})
export class CatsModule {}
Global modules
CatsModule를 import해서 쓸 때는importsarray에CatsModule를 넣어서 쓰지 않아도 된다.- 이미 전역적으로 선언이 된 모듈이기 때문에
@Global()
@Module({
  controllers: [CatsController],
  providers: [CatsService],
  exports: [CatsService],
})
export class CatsModule {}
댓글남기기